Getting started making mods
To get started, download the latest version of Unity. The free version is enough. You will use Unity to prepare the modding data to be loaded by Fairtravel Battle. In addition, you must download the latest game data sources. These contain text files you can modify to change the game data.
Creating the Unity Project
Fairtravel Battle loads Asset Bundles created by Unity, so we must set up a new project to build them. Create a new project of any kind using Unity Hub, then create a folder called AssetBundles inside it, and inside that folder, create another folder with the name of your mod. We will use the name coolmod for this guide. You will need to create your folders in a way like AssetBundles/coolmod.
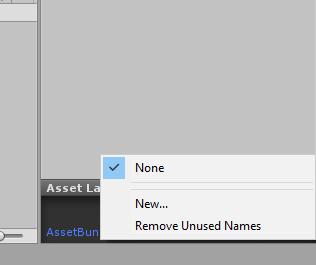
Then, while selecting the coolmod folder, on the bottom right corner of Unity, there should be a text saying Asset Bundle:. Press the button to the right of it, and choose New..., then type coolmod/coolmod.
Copy the AssetManifest.json file from the game data source files and put it inside your mod folder. There, you can tell Fairtravel Battle which files you want to provide to it.
How does the Asset Manifest work?
The Asset Manifest file tells Fairtravel Battle which folders inside coolmod are supposed to be scanned for files and make available in the game.
You can override which files are actually used by making your mod load after other mods. For instance, if a mod exposes file Textures/cooltexture.png, and your mod also exposes a file Textures/cooltexture.png, if your mod is loaded after, then your mod's file will be used. This allows you to replace cards and images from existing cards, or giving more images to use on new cards.
Exposing a file or folder
The AssetManifest.json file has a format in this form:
{
    "filesList": [
        "file.txt"
    ]
}
Inside the filesList, you can write the location of files inside your AssetBundles/coolmod folder to expose them. To expose a file in the path AssetBundles/coolmod/file.txt, you can write "file.txt". To expose the png files inside AssetBundles/coolmod/Textures, you can write "Textures/*.png".
Generating the asset bundle
After you have your files inside, you need to build the asset bundles. To do so, you'll need to add a script to your project:
#if UNITY_EDITOR
using UnityEngine;
using UnityEditor;
using System.IO;

public class CreateAssetBundles
{
    [MenuItem("Fairtravel Battle/Build AssetBundles")]
    static void BuildAllAssetBundles()
    {
        try
        {
            Directory.CreateDirectory(string.Format("{0}/StreamingAssets", Application.dataPath));
        }
        catch(System.Exception)
        {
        }

        BuildPipeline.BuildAssetBundles("Assets/StreamingAssets", BuildAssetBundleOptions.ChunkBasedCompression, EditorUserBuildSettings.activeBuildTarget);
    }
}
#endif
This will add a Fairtravel menu option in the unity menu. When you use the Build AssetBundles option, it'll create the asset bundles for you.
Once the asset bundles are generated, they'll be inside a StreamingAssets folder.
Finishing setting things up
To set your mod to load with Fairtravel Battle, you must copy the packages.list file that is bundled with Fairtravel Battle, in the StreamingAssets folder, and put it in the Fairtravel Battle Persistent Folder. Then, you can edit it, and change the order of which mods will be loaded.
The folders where this is usually located are:
Windows
%APPDATA%\..\LocalLow\Flaming Torch Games\Fairtravel Battle
Linux
~/.config/unity3d/Flaming Torch Games/Fairtravel Battle
macOS
~/Library/Application Support/com.ftg.fairtravelbattle
Inside these folders, you should create a Assets folder, if there isn't one already. Then, inside that folder, create a coolmod folder inside it to place your mod's asset bundle.
Finally, edit the packages.list file that you copied to the persistent folder, and add coolmod to the list.
The End
This is the end of this guide. From here on out, you can do other things: